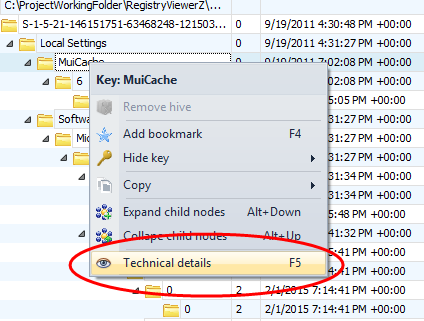
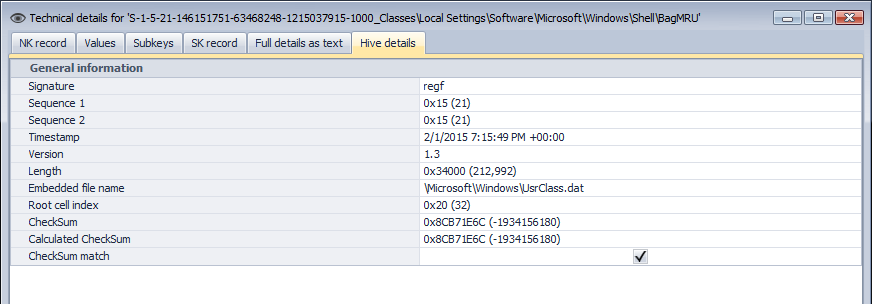
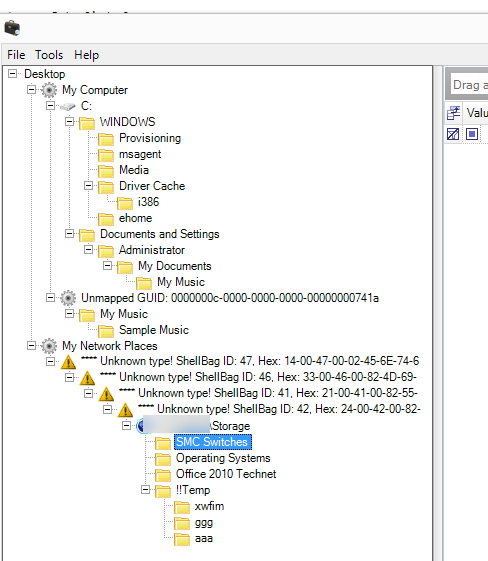
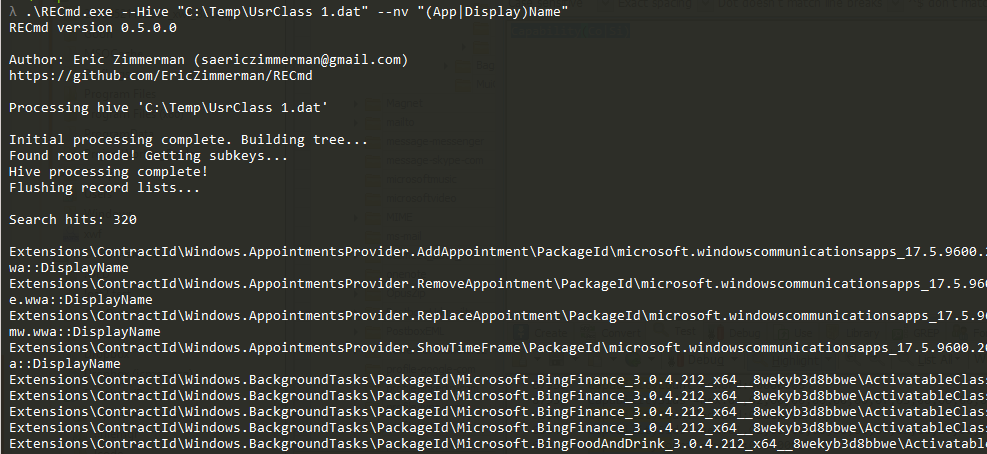
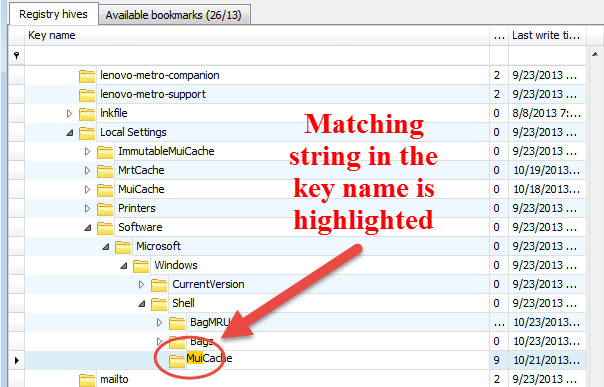
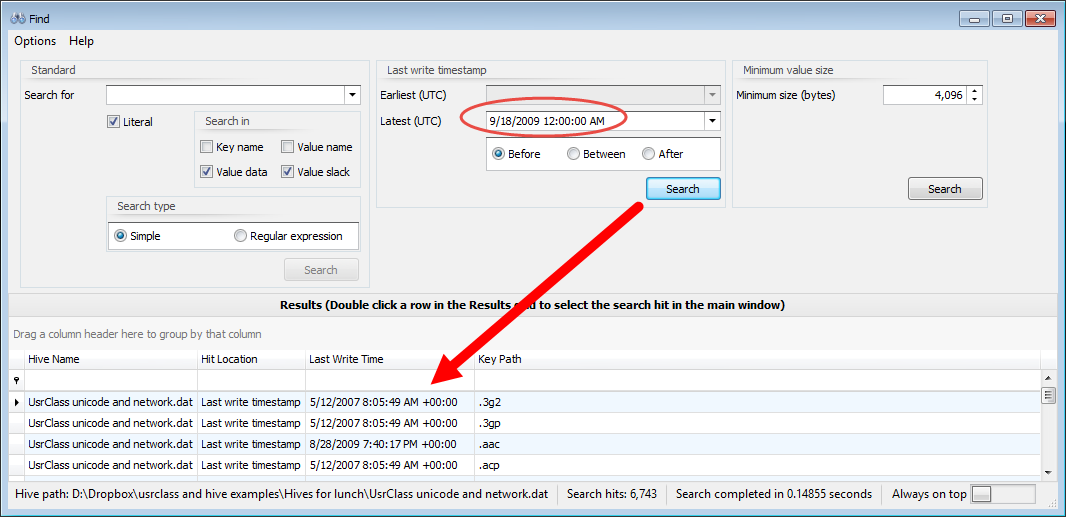
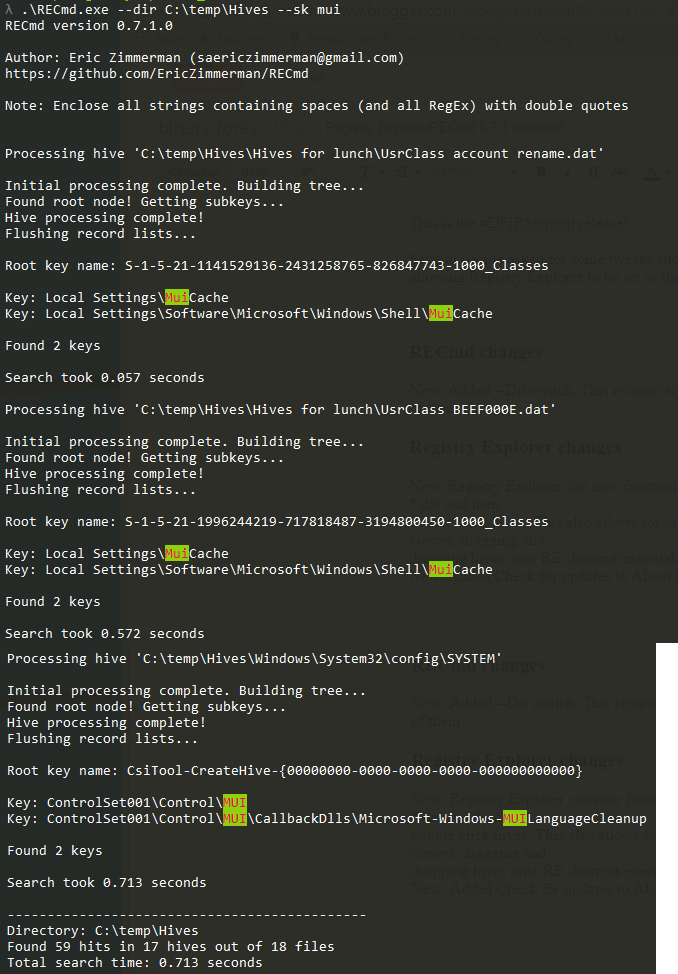
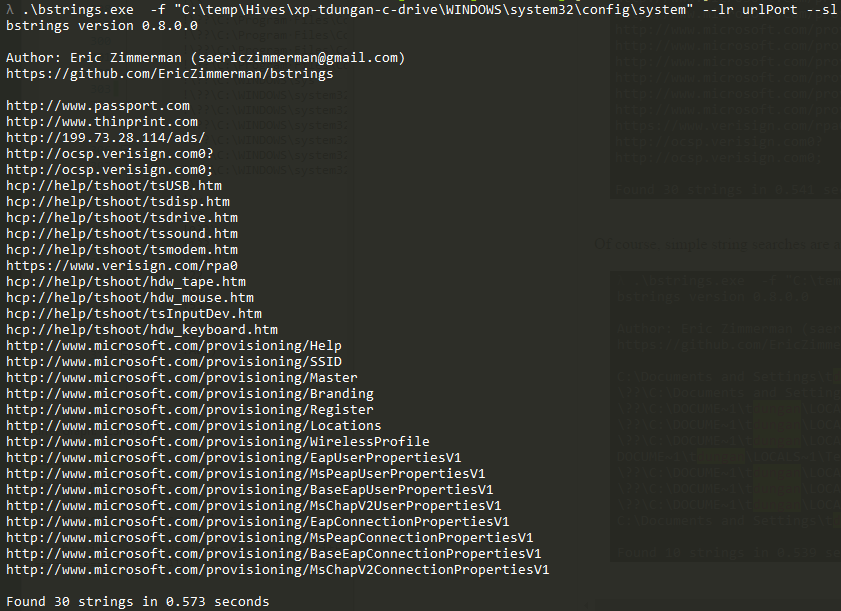
In part 3, we covered VK records. Next up is the SK record, or Security Key
![]()
In total, there are up to 17 pieces of information in an SK record. The SK record is a bit stranger (and far more complicated) than the other records we have seen before in that it is somewhat nested. The more interesting pieces of information include:
The size works the same way in SK records as it did in the NK and VK records, so our actual record size is 216 bytes.
Blink (Backward link) starts at offset 0x0C and is stored as a 32-bit unsigned integer. Blink is the offset to the previous SK record in the hive.
Control will be used later and we will check it to know whether or not to try to parse a SACL or DACL structure from our bytes.
The ACL breaks down as follows:
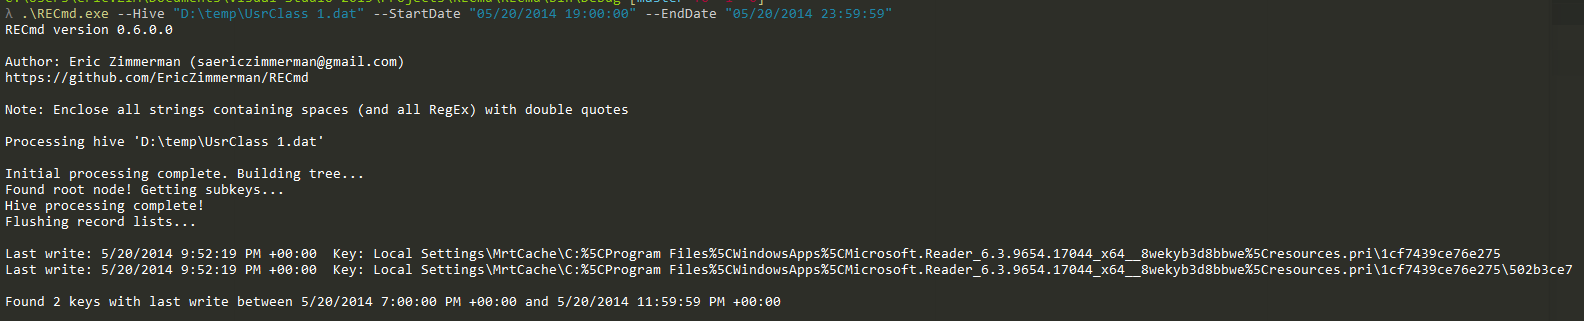
Since our DACL was the bigger of the two structures, lets process that one by hand.
Recall the raw bytes for the DACL were:
Size = 0x8400, or 132 in decimal
ACE count = 0x0500, or 5 in decimal
This leaves the following bytes which contains our ACE records:
An ACE record looks like this:
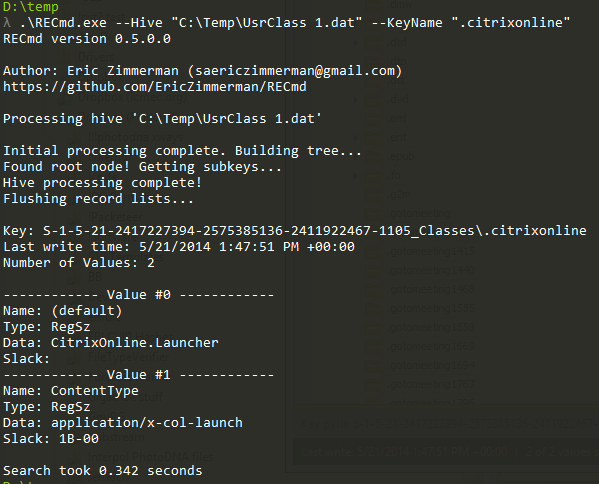
When the raw SID is converted we get S-1-5-21-2417227394-2575385136-2411922467-1105. This corresponds to a user SID which could be looked up accordingly in another hive.
If you made it this far, congratulations! I told you SK records were complicated!
![]()
For a full breakdown of the SK record layout and all its parts, review the documents posted earlier.
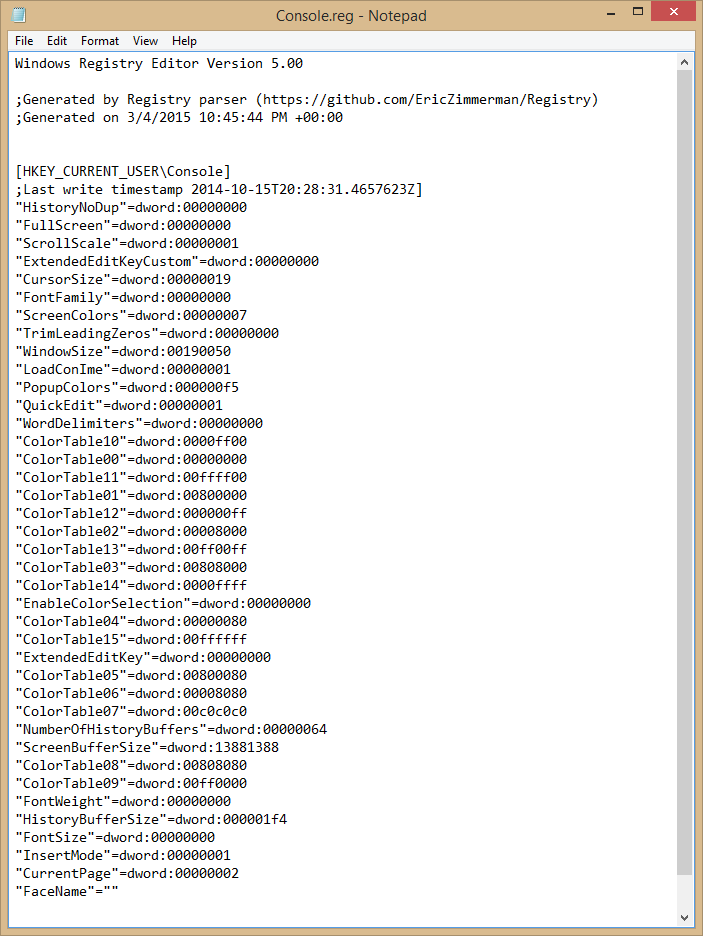
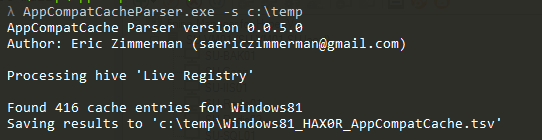
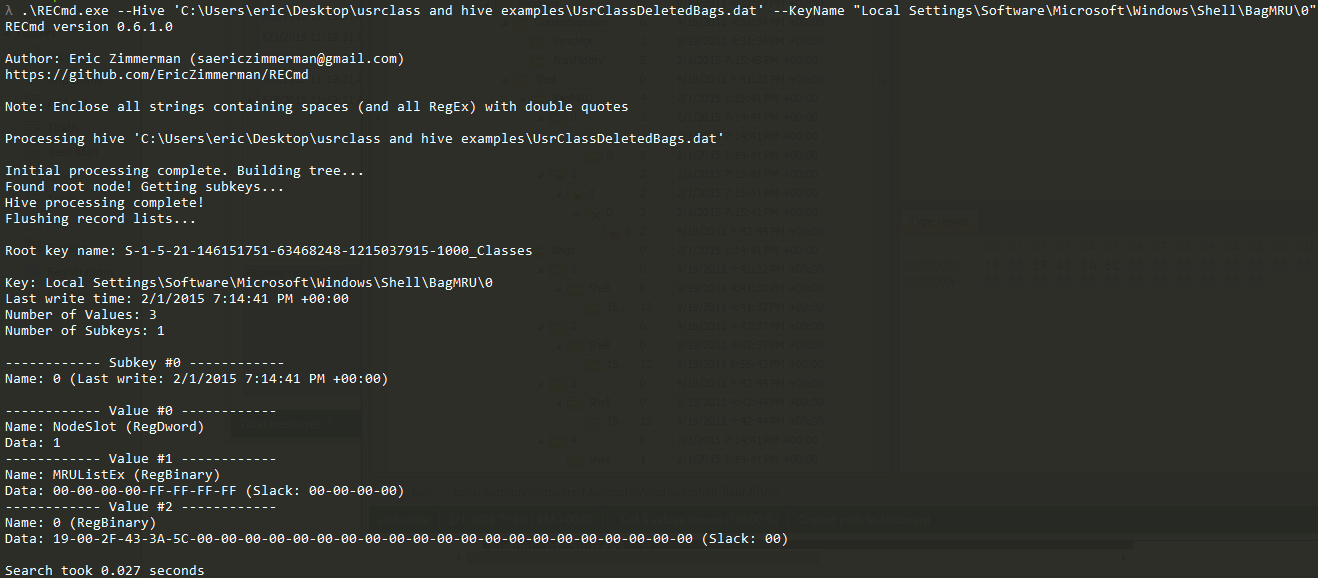
If we look at the ToString() output from my Registry parser, we get this:
SK record
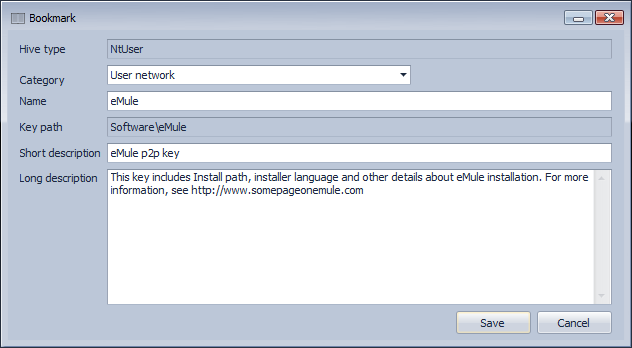
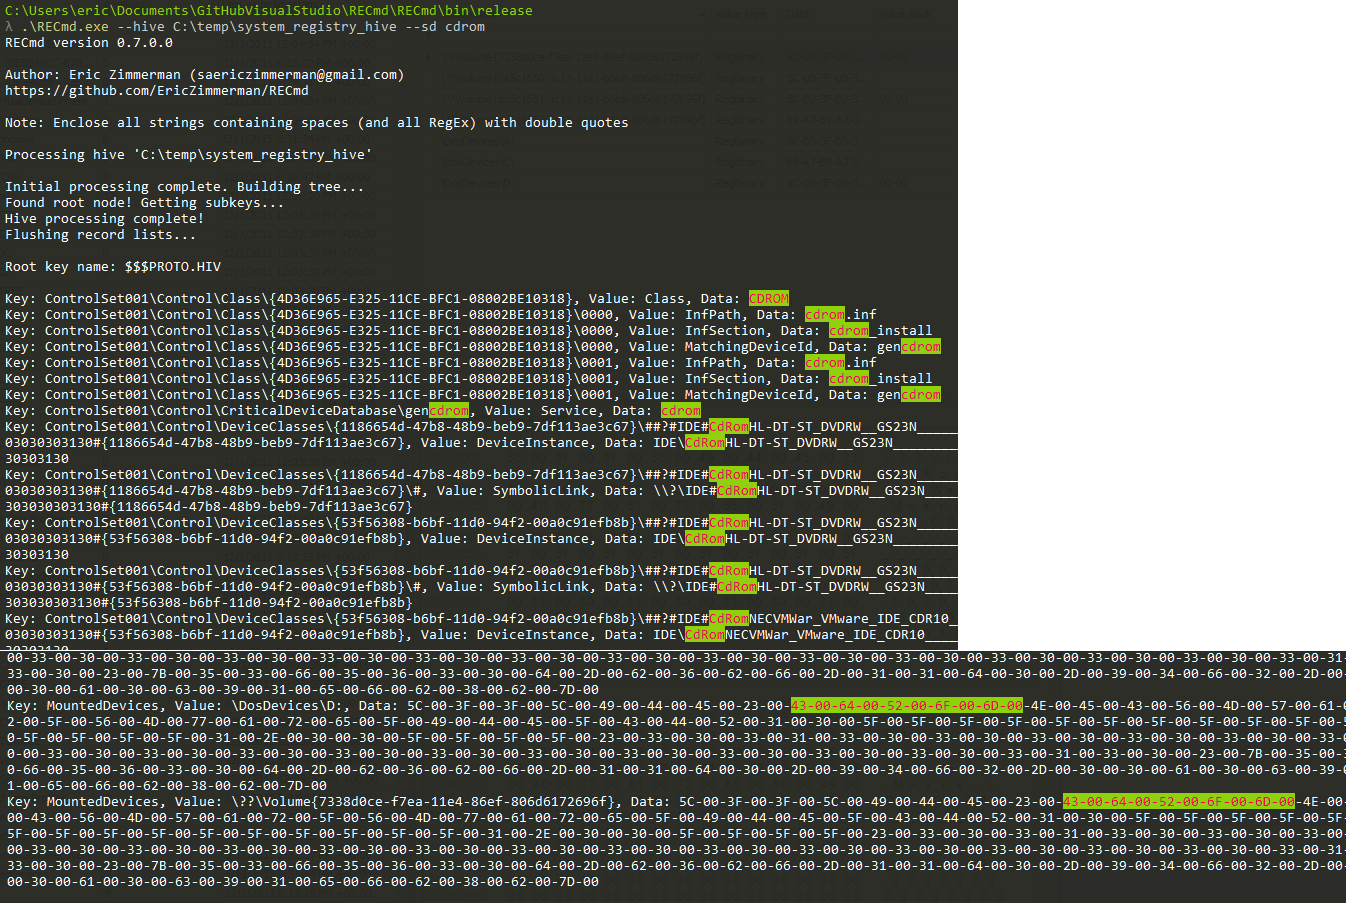
An SK (security key) record contains the information necessary to define access controls for the Registry. An example of an SK record as it exists on disk is shown below.
In total, there are up to 17 pieces of information in an SK record. The SK record is a bit stranger (and far more complicated) than the other records we have seen before in that it is somewhat nested. The more interesting pieces of information include:
- Size
- Signature
- Flink and Blink
- Reference count
- Descriptor
- Control
- Owner offset
- Group offset
- SACL (Security ACL, used for auditing purposes) offset
- DACL (Discretionary ACL, used for controlling access) offset
- SACL
- DACL
- Owner SID (Security IDentifier)
- Group SID
Size
The size starts at offset 0x00 and is stored as signed 32-bit integer. In the example above, the hex value is 0x28FFFFFF (stored in little endian format). Converting the value to decimal results in -216 (negative 216).The size works the same way in SK records as it did in the NK and VK records, so our actual record size is 216 bytes.
Signature
The signature for an SK record is found at offset 0x04. The signature for an SK record is the ASCII string "sk" which is 0x736B in hex.Flink and Blink
Flink (Forward link) starts at offset 0x08 and is stored as a 32-bit unsigned integer. Flink is the offset to the next SK record in the hive.
Blink (Backward link) starts at offset 0x0C and is stored as a 32-bit unsigned integer. Blink is the offset to the previous SK record in the hive.
In the example above, the Flink is 0x10C30000 and the Blink is 0xF0C30800. As with other offsets, these are relative offsets, so we would have to add 0x1000 to get to their actual position on disk.
Flink and Blink are used to build the "chain" of SK records in a hive.
Reference count
The Reference count starts at offset 0x10 and is stored as a 32-bit unsigned integer. Reference count reflects the total number of references from NK records a particular SK record has.
In the example above, Reference count is 0x010000, or 1 in decimal. Recall from our discussion on NK records that they contain a Security Key offset. The NK record's Security Key offset would point to an SK record, and for each one doing so, Reference count would be increased by 1.
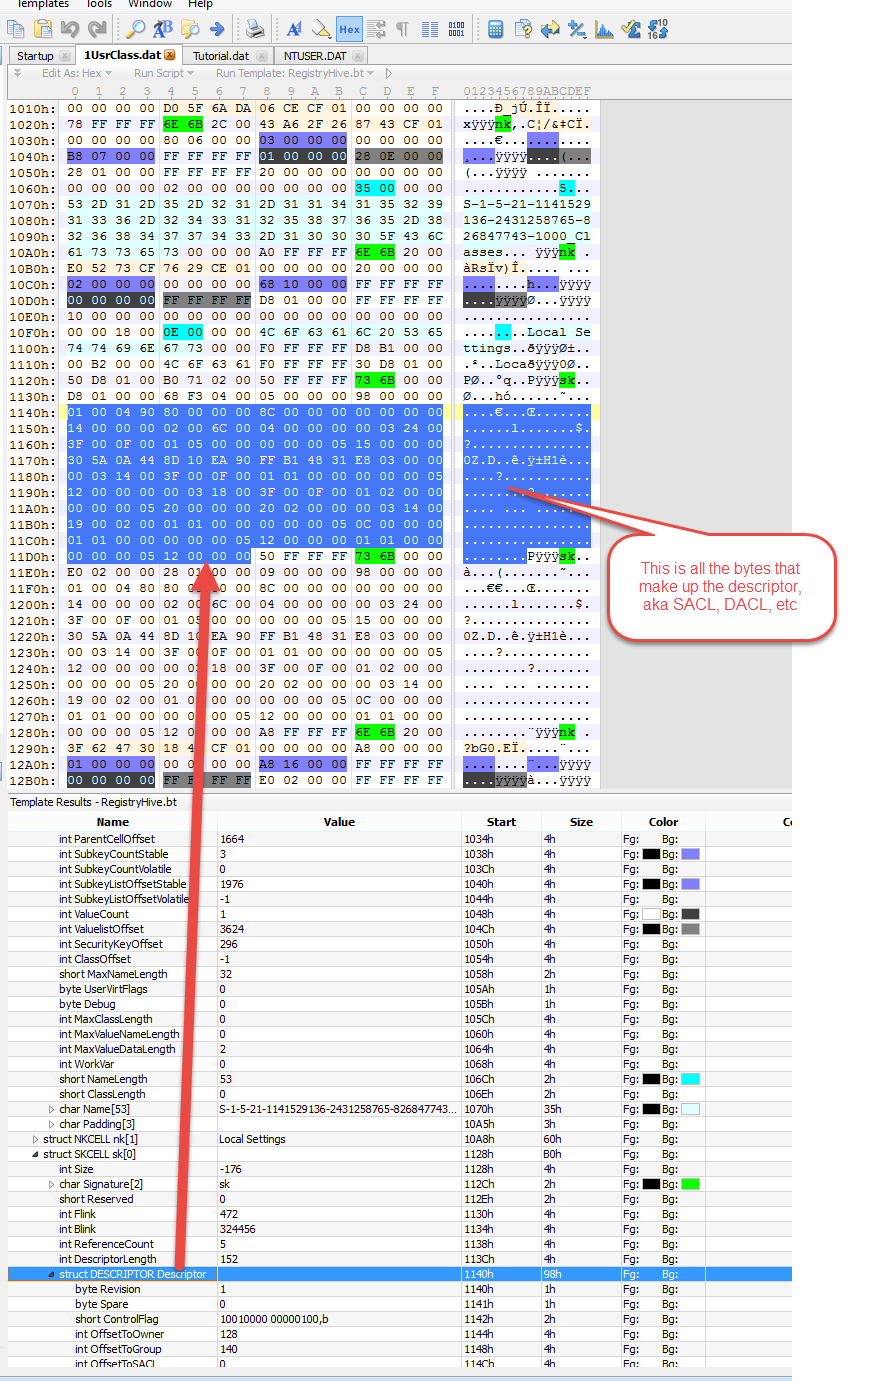
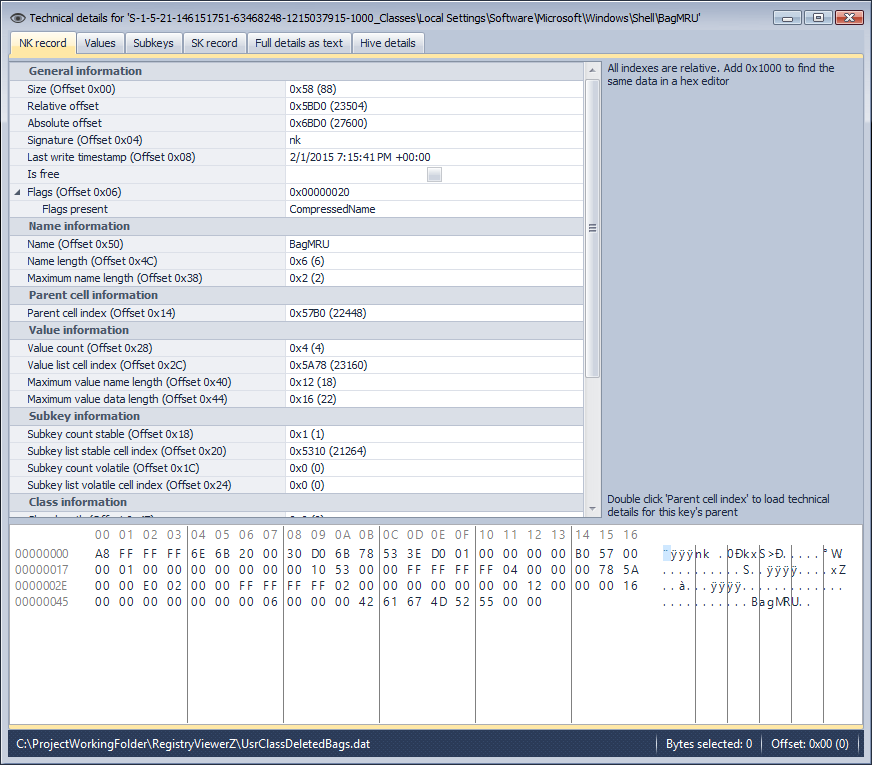
Descriptor
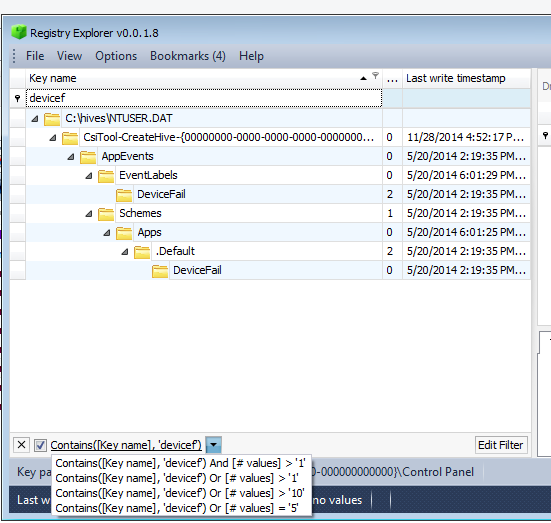
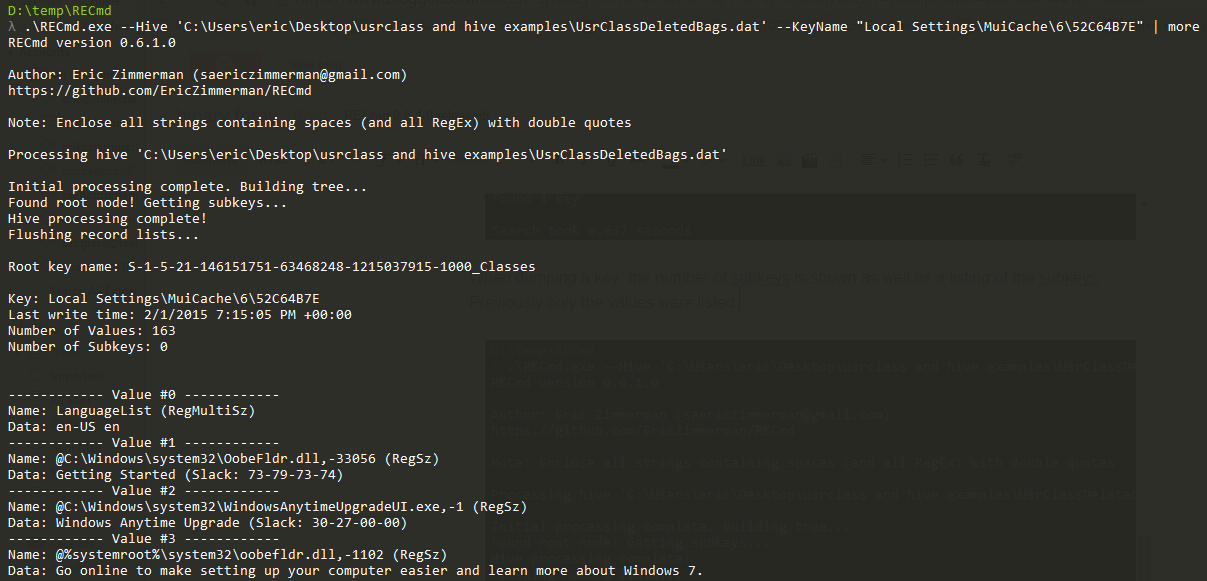
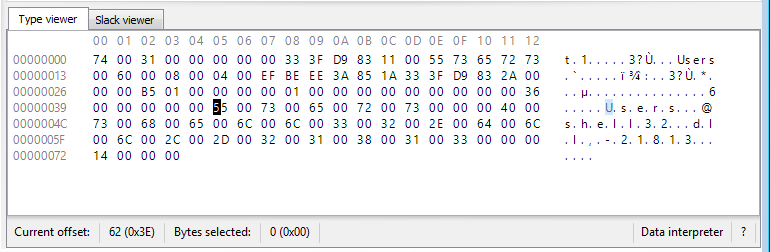
The Descriptor starts at offset 0x18. The length of the Descriptor data starts at offset 0x14 and is stored as a 32-bit unsigned integer.
In the example above, the Descriptor length is is 0xBC000000, or 188 in decimal. If we start at offset 0x18 and sweep 188 bytes, we get the following:
![]()
Before we jump into the Descriptor, notice how we again see some extra stuff after the Descriptor bytes. This is padding. The same calculations we saw before can be used to verify the SK record is a multiple of 8:
20 (bytes before Descriptor data) + 188 (Descriptor data) + 8 (Padding) == 216 which is what our Size reflects.
Descriptor breakdown
After determining if this record does in fact have Descriptor data (Descriptor length is greater than zero), we can parse out the parts that make up the Descriptor.
As mentioned above, the Descriptor has the following parts we are interested in:
- Control
- Owner offset
- Group offset
- SACL offset
- DACL offset
- SACL
- DACL
- Owner SID
- Group SID
Control
The Control starts at offset 0x1A and is stored as a 16-bit unsigned integer. In the example above, Control is 0x1498, or 0x9814 once we convert it from little endian.
Control is a flag that has the following values:
- SeDaclAutoInherited = 0x0400
- SeDaclAutoInheritReq = 0x0100
- SeDaclDefaulted = 0x0008
- SeDaclPresent = 0x0004
- SeDaclProtected = 0x1000
- SeGroupDefaulted = 0x0002
- SeOwnerDefaulted = 0x0001
- SeRmControlValid = 0x4000
- SeSaclAutoInherited = 0x0800
- SeSaclAutoInheritReq = 0x0200
- SeSaclDefaulted = 0x0020
- SeSaclPresent = 0x0010
- SeSaclProtected = 0x2000
- SeSelfRelative = 0x8000
In this particular instance, Control is equivalent to the following:
SeDaclPresent | SeDaclProtected | SeSaclAutoInherited | SeSaclPresent | SeSelfRelativeThese flag values can be calculated exactly the same as we have previously seen, so we won't repeat that here.
Control will be used later and we will check it to know whether or not to try to parse a SACL or DACL structure from our bytes.
Owner offset
The Owner offset starts at offset 0x1C and is stored as a 32-bit unsigned integer. In the example above, Owner offset is 0xA0000000.
After we discuss the Group, SACL and DACL offset below we will see exactly what lives in these offsets.
Group offset
The Owner offset starts at offset 0x20 and is stored as a 32-bit unsigned integer. In the example above, Owner offset is 0xB0000000.
The Owner offset and Group offset hold the relative offsets inside the Descriptor data to where the Owner and Group SIDs (Security IDentifier) can be found. Before we can get that data tho, we need a few more pieces of information.
SACL offset
The SACL offset starts at offset 0x24 and is stored as a 32-bit unsigned integer. In the example above, Owner offset is 0x14000000.
DACL offset
The DACL offset starts at offset 0x28 and is stored as a 32-bit unsigned integer. In the example above, Owner offset is 0x1C000000.
Now that we have all of our offsets to the relevant data structures, we can determine the length of each of these structures as follows:
- SACL size == DACL offset - SACL offset, or 0x08
- DACL size == Owner offset - DACL offset, or 0x84
- Owner SID size == Group offset - Owner offset, or 0x10
- Group SID size ==Descriptor length - Group offset, or 0x0C
We now know the length of each of the structures in bytes and can grab those bytes and parse them out.
In our example above, the raw SACL bytes would be:
02-00-08-00-00-00-00-00
and the raw DACL bytes would be:
02-00-84-00-05-00-00-00-00-03-24-00-3F-00-0F-00-01-05-00-00-00-00-00-05-15-00-00-00-82-F6-13-90-30-42-81-99-23-04-C3-8F-51-04-00-00-00-03-14-00-3F-00-0F-00-01-01-00-00-00-00-00-05-12-00-00-00-00-03-18-00-3F-00-0F-00-01-02-00-00-00-00-00-05-20-00-00-00-20-02-00-00-00-03-14-00-19-00-02-00-01-01-00-00-00-00-00-05-0C-00-00-00-00-00-18-00-19-00-02-00-01-02-00-00-00-00-00-0F-02-00-00-00-01-00-00-00
In our example above, the raw Owner SID bytes would be:
01-02-00-00-00-00-00-05-20-00-00-00-20-02-00-00
and the raw Group SID bytes would be:
01-01-00-00-00-00-00-05-12-00-00-00
Decoding raw SID bytes to a more common format
To decode the raw bytes to a format we are more used to seeing, we have to do some manipulation of the bytes as described here. If you are curious as to exactly how to do this, please visit that link.
When we convert our raw bytes for Owner and Group SID, we get the following:
- Owner SID: S-1-5-32-544
- Group SID: S-1-5-18
Seeing a SID in that format is less than helpful, so it would be nice if we could convert those SIDs into something that means a little more, such as whether or not the SID is used for a service account, the users group, an anonymous logon group, and so on.
My Registry parsing code has a large collection of lookup values that can be used to cross reference the SID to a description. Of course this all happens under the covers for you when using the parser, but if we look up those SIDs manually (via the link or via Google, etc), we get the following descriptions:
- S-1-5-32-544 is equivalent to Built in Administrators
- S-1-5-18 is equivalent to Local System
This certainly makes life easier than memorizing or constantly looking up a bunch of SIDs for various keys in a hive.
Decoding raw SACL and DACL bytes
Finally we get to the last pieces of the horrible nastiness that is SK records.
Recall earlier to what our Control flag value was. Since it contains SeDaclPresent and SeSaclPresent we know we can parse out those structures.
The format for both SACL and DACL structures is the same. To simplify things a bit, lets refer to the common structure as an ACL. The more interesting fields in an ACL are:
- Size
- ACE (Access Control Entry) count
- ACE records
- Size starts at offset 0x02 and is stored as a 16-bit unsigned integer.
- ACE count starts at offset 0x04 and is stored as a 16-bit unsigned integer.
- The ACE records start at offset 0x08.
Since our DACL was the bigger of the two structures, lets process that one by hand.
Recall the raw bytes for the DACL were:
02-00-84-00-05-00-00-00-00-03-24-00-3F-00-0F-00-01-05-00-00-00-00-00-05-15-00-00-00-82-F6-13-90-30-42-81-99-23-04-C3-8F-51-04-00-00-00-03-14-00-3F-00-0F-00-01-01-00-00-00-00-00-05-12-00-00-00-00-03-18-00-3F-00-0F-00-01-02-00-00-00-00-00-05-20-00-00-00-20-02-00-00-00-03-14-00-19-00-02-00-01-01-00-00-00-00-00-05-0C-00-00-00-00-00-18-00-19-00-02-00-01-02-00-00-00-00-00-0F-02-00-00-00-01-00-00-00Following our template we can determine the following:
Size = 0x8400, or 132 in decimal
ACE count = 0x0500, or 5 in decimal
This leaves the following bytes which contains our ACE records:
03-24-00-3F-00-0F-00-01-05-00-00-00-00-00-05-15-00-00-00-82-F6-13-90-30-42-81-99-23-04-C3-8F-51-04-00-00-00-03-14-00-3F-00-0F-00-01-01-00-00-00-00-00-05-12-00-00-00-00-03-18-00-3F-00-0F-00-01-02-00-00-00-00-00-05-20-00-00-00-20-02-00-00-00-03-14-00-19-00-02-00-01-01-00-00-00-00-00-05-0C-00-00-00-00-00-18-00-19-00-02-00-01-02-00-00-00-00-00-0F-02-00-00-00-01-00-00-00
An ACE record looks like this:
- Ace type: 1 byte long starting at offset 0x00
- Ace flags: 1 byte long starting at offset 0x01
- Ace Size: 16-bit unsigned integer starting at offset 0x02
- Mask: 32-bit unsigned integer starting at offset 0x04
- SID: Starting at offset 0x08
Based on what we saw above, the ACE count is five, so we would expect there to be enough bytes to find five ACE records from the bytes above.
If we follow our template, we get the following five chunks of bytes:
- 00-03-24-00-3F-00-0F-00-01-05-00-00-00-00-00-05-15-00-00-00-82-F6-13-90-30-42-81-99-23-04-C3-8F-51-04-00-00
- 00-03-14-00-3F-00-0F-00-01-01-00-00-00-00-00-05-12-00-00-00
- 00-03-18-00-3F-00-0F-00-01-02-00-00-00-00-00-05-20-00-00-00-20-02-00-00
- 00-03-14-00-19-00-02-00-01-01-00-00-00-00-00-05-0C-00-00-00
- 00-00-18-00-19-00-02-00-01-02-00-00-00-00-00-0F-02-00-00-00-01-00-00-00
For each of these chunks of bytes, we can build an ACE record. If we take the first chunk and process it, we get the following:
- Ace type: 0x00
- Ace flags: 0x03
- Ace Size: 0x2400, or 24 in decimal
- Mask: 0x3F000F
- SID: 01-05-00-00-00-00-00-05-15-00-00-00-82-F6-13-90-30-42-81-99-23-04-C3-8F-51-04-00-00
Ace type is equivalent to:
AccessAllowedAceType
Ace flags is equivalent to:
ContainerInheritAce | ObjectInheritAce
Mask is a flag and is the equivalent to:
FullControl
When the raw SID is converted we get S-1-5-21-2417227394-2575385136-2411922467-1105. This corresponds to a user SID which could be looked up accordingly in another hive.
Now we have to repeat that for the last four ACE records and we have completed one SK record!
If you made it this far, congratulations! I told you SK records were complicated!
Putting it all (back) together
Let's take our example and break it down into the most important parts.

For a full breakdown of the SK record layout and all its parts, review the documents posted earlier.
If we look at the ToString() output from my Registry parser, we get this:
Size: 0xD8Relative Offset: 0xB0Absolute Offset: 0x10B0Signature: skIs Free: FalseForward Link: 0xC310Backward Link: 0x8C3F0Reference Count: 1Security descriptor length: 0xBCSecurity descriptor: Revision: 0x1Control: SeDaclPresent, SeSaclPresent, SeSaclAutoInherited, SeDaclProtected, SeSelfRelativeOwner offset: 0xA0Owner SID: S-1-5-32-544Owner SID Type: BuiltinAdministratorsGroup offset: 0xB0Group SID: S-1-5-18Group SID Type: LocalSystemDacl Offset: 0x1CDACL: ACL Size: 0x2ACL Type: DiscretionaryACE Records Count: 5------------ Ace record #0 ------------ACE Size: 0x24ACE Type: AccessAllowedAceTypeACE Flags: ObjectInheritAce, ContainerInheritAceMask: FullControlSID: S-1-5-21-2417227394-2575385136-2411922467-1105SID Type: UnknownOrUserSIDSID Type Description: SID does not map to a common SID or this is a user SID------------ Ace record #1 ------------ACE Size:0x14ACE Type: AccessAllowedAceTypeACE Flags: ObjectInheritAce, ContainerInheritAceMask: FullControlSID: S-1-5-18SID Type: LocalSystemSID Type Description: S-1-5-18: An account that is used by the operating system.------------ Ace record #2 ------------ACE Size: 0x18ACE Type: AccessAllowedAceTypeACE Flags: ObjectInheritAce, ContainerInheritAceMask: FullControlSID: S-1-5-32-544SID Type: BuiltinAdministratorsSID Type Description: S-1-5-32-544: A built-in group. After the initial installation of the operating system, the only member of the group is the Administrator account. When a computer joins a domain, the Domain Administrators group is added to the Administrators group. When a server becomes a domain controller, the Enterprise Administrators group also is added to the Administrators group.------------ Ace record #3 ------------ACE Size: 0x14ACE Type: AccessAllowedAceTypeACE Flags: ObjectInheritAce, ContainerInheritAceMask: QueryValue, EnumerateSubkeys, Notify, ReadControlSID: S-1-5-12SID Type: RestrictedCodeSID Type Description: S-1-5-12: This SID is used to control access by untrusted code. ACL validation against tokens with RC consists of two checks, one against the token's normal list of SIDs and one against a second list (typically containing RC - the RESTRICTED_CODE token - and a subset of the original token SIDs). Access is granted only if a token passes both tests. Any ACL that specifies RC must also specify WD - the EVERYONE token. When RC is paired with WD in an ACL, a superset of EVERYONE, including untrusted code, is described.------------ Ace record #4 ------------ACE Size: 0x18ACE Type: AccessAllowedAceTypeACE Flags: NoneMask: QueryValue, EnumerateSubkeys, Notify, ReadControlSID: S-1-15-2-1SID Type: AllAppPackagesSID Type Description: S-1-15-2-1: All applications running in an app package context.Sacl Offset: 0x14SACL: ACL Size: 0x2ACL Type: SecurityACE Records Count: 0